Override the TFS Team Build OutDir property in TFS 2013

I’ve blogged twice before about the OutDir MSBuild property set by Team Build and I’ve recently discovered that with the default build process templates included with Team Foundation Server 2013, the passing of the OutDir can be disabled via a simple Team Build process parameter.

The parameter I am referring to is the “Output location”:

outputlocation

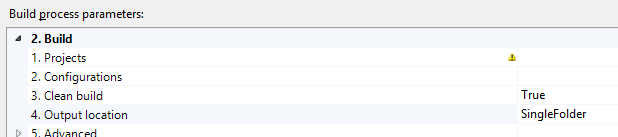
This parameter’s default value, “SingleFolder”, gives the traditional Team Build behaviour – the OutDir property will be specified on the MSBuild command-line and, unless you’ve made other changes, all build outputs will be dropped into this single folder.

Another value this parameter accepts is “PerProject” but this name can be slightly misleading. The OutDir property will still be specified on the MSBuild command-line but Team Build will append a subfolder for each project that has been specified in the Build Definition. That is, you may choose to build SolutionA.sln and SolutionB.sln from a single Build Definition and the “PerProject” option will split these into “SolutionA” and “SolutionB” subfolders. It will not output to different subfolders for the projects contained within each solution – for this behaviour you should specify the GenerateProjectSpecificOutputFolder property as an MSBuild argument as I’ve blogged previously.

The value of the “Output location” that you’ve probably been looking for is “AsConfigured”. With this setting, Team Build will not pass the OutDir property to MSBuild at all and your projects will all build to their usual locations, just like they do in Visual Studio – presumably to a \bin\ folder under each project. With this setting, it is then your responsibility to configure a post-build target or script to copy the required files from their default build locations to the Team Build binaries share. For this purpose, Team Build provides a “TF_BUILD_BINARIESDIRECTORY” environment variable specifying the destination path to use. There are also some other environment variables populated by Team Build 2013 documented here.

At the end of the build process, Team Build will then copy the contents of the TF_BUILD_BINARIESDIRECTORY to either the UNC path drop folder, or to storage within the TFS Collection database itself as you’ve chosen via the Staging Location setting on the Build Defaults page.

However, before you rush away to use this new capability, consider that the MSBuild, or more accurately the set of Microsoft.*.targets files used by almost all projects, already contain a great quantity of logic for handling which files to copy to the build drop. For example, Web Application projects, will copy the contents of the \bin\ folder and all the other content files (eg css, javascript, and images) whilst excluding C# code files, and the project file. Instead of re-implementing this behaviour yourself, leverage what MSBuild already provides and use the existing hook points to adjust this behaviour when you need to alter it for your situation.

If you’re interested, you’ll find that this new “Output location” behaviour is now implemented in the new RunMSBuild workflow activity, specifically within its RunMSBuildInternal private nested activity.

Update NuGet.exe version used by Team Build 2013 Package Restore

Since NuGet 2.7, there is a new approach to Package Restore. In short, it involves executing “nuget.exe restore” before building the solution or project, instead of having each project import the “nuget.targets” file. This new restore workflow solves a number of issues, especially with packages containing MSBuild customizations, but also with parallel builds conflicting when performing the restore in parallel.

Additionally, Team Foundation Server 2013’s Team Build implements this new Package Restore workflow in its default build process templates for both TFVC and Git repositories without any effort. This functionality is implemented care of the new RunMSBuild workflow activity (not to be confused with the original MSBuild workflow activity).

The RunMSBuild activity internally uses another new activity named “NuGetRestore”, which is also conveniently a public type you can use directly in customized build process templates. The NuGetRestore activity simply runs “nuget.exe” via the InvokeProcess activity to perform the real work, so there is no special TFS-only behaviour.

However, by default, the copy of “nuget.exe” that is used for the restore is located in the same folder as the assembly declaring the NuGetRestore activity (Microsoft.TeamFoundation.Build.Activities.dll) typically located in “C:\Program Files\Microsoft Team Foundation Server 12.0\Tools”. The version of this “nuget.exe” that ships with TFS 2013 RTM is version 2.7 but there is a good chance there will regularly be a newer NuGet available than the version shipped with Team Build, and with features you need or want. For example, version 2.8 was recently released and the new Fallback to Local Cache feature would be one handy way to improve build resiliency when the build agent can’t always connect to a NuGet repository.

I’ve done some research and I have found there are basically two options available for using a newer version of NuGet in your Team Builds now:

  1. Remote to each Team Build Agent with local Administrator privileges, and execute “nuget.exe update -self” on the file located in the TFS Tools folder mentioned above, or …
  2. Customize your build process XAML file in two places:
    1. Set the “RestoreNuGetPackages” argument to “false” on the RunMSBuild activity to avoid using the default “nuget.exe”.
    2. Insert the NuGetRestore activity immediately before RunMSBuild set the “ToolPath” argument to the location of the desired version of “nuget.exe” to use.

With any luck, each future TFS update will ship with the most recent version of NuGet for those builds that can wait.

Visual Studio Solutions, Projects, and shared code

I have been having numerous discussions with a variety of people about shared code in .NET code bases and I decided to blog my thoughts on the topic here – partly to reduce repetition, partly to help me distill the concepts in my own mind.

To clarify, these are my guidelines or rules of thumb. It is where I start when investigating options to improve handling shared code but I will bend these rules when required and I reserve the right to change my mind based on my future experiences.

To begin, there seem to be two basic perspectives on the purpose of a Visual Studio Solution.

  1. A Solution is a container, a boundary. It includes everything required for a software system to be built and tested. The only dependencies external to the Solution are third party dependencies or internal dependencies from a package management system like NuGet.
  2. A Solution is a view, a window. It includes only the necessary items to work with a particular aspect of a software system. Projects within a Solution will routinely be dependent on other Projects not in the Solution. There will often be multiple Solutions that overlap with, or completely encompass, other Solutions.

I subscribe to the first group. I believe this is the model that Visual Studio guides developers toward through its default behaviours and through the challenges that arise when veering away from this model. I believe that a new team member should be able to clone a clean working set of source from version control and build the Solution and have all they need within the IDE. I like that a successful build of the open Solution (mostly) indicates that I haven’t accidentally changed or removed code used elsewhere.

To follow, given a common scenario of two mostly discrete Solutions that currently share a common Project between them, I start asking:

  • Can the Project be moved into a new, third Solution and packaged as a NuGet package? The original Solutions then reference this shared Project by its Package from (private) NuGet Repository. This can lengthen the feedback cycle when debugging, so if this leads to a poor experience because the shared Project is a common source of issues, a better suite of Integration Tests in the third Solution may help. If the shared Project changes often to implement features rather than fix bugs this may not be a good option.
  • Can the two Solutions be combined into one all-inclusive Solution? Would the new Solution then have too many Projects resulting a the build and/or test experience too slow or resource intensive? If the Project count is too high and code has been separated into Projects simply to enforce layer separation, perhaps some Projects can be consolidated and a tool like NDepend used to enforce separation.
  • Do the two Solutions together represent too large a system? Is the coupling to the shared Project an indication of a design that would benefit from significant refactoring – for example, favouring composition over inheritance.

Finally, what is the value of sharing the common Project? In my experience, increased code reuse is associated with higher coupling. Duplication of the shared code instead may prove beneficial in other stages of the delivery cycle and reduce each Solutions influence/impact on the other.

I am also reminded of Paul Stovell’s short series of useful articles about Integration. The Shared Database solution is an example where a Data Access Layer Project might be shared between two Solutions but the Messaging approach is an example where the two Solutions could be much more independent.

NuGet Reference Paths for Projects in Multiple Solutions

This year I have been working with a code base that exhibits Visual Studio projects with three characteristics:

  1. The project references a NuGet package.
  2. The project is included in more than one Visual Studio solution.
  3. The solution files are located in different folders.

I’m not sure how common this scenario is. A few different threads on the NuGet CodePlex site suggests at least some other people are wrestling with it. Personally I endeavour to structure a code base to avoid sharing projects between solutions but for old, high-coupled code this can be difficult to achieve.

The problem with this scenario is with the relative paths used to resolve the assemblies within the referenced NuGet package when building the project in clean or constrained working folders – such as on a build agent or when someone first clones a repository. When a NuGet package is installed or updated in a project, the path to the package assemblies are specified relative to the /packages/ folder of the currently open solution. However, when another solution including the same project is built, the assembly won’t be resolved either because the first solution’s /packages/ folder is not present in the workspace and the NuGet Package Restore workflow has put the assemblies in the second solution’s /packages/ folder.

The existing attempts to solve this issue, and the same way I approached the problem originally, tend to be focused on writing reference paths relative to an MSBuild property like $(SolutionDir) or $(PackageDir) which then allows the path to be resolved correctly at build time. If I understand correctly, this approach has been rejected from becoming part of the official NuGet application because it doesn’t handle the scenario where a project is being built directly, not being built as part of a solution – something I also avoid generally.

Last week I had an idea to tackle the problem dynamically at build time instead of when the reference path is written to the project file. My solution is to introduce (yet another) NuGet package to the affected projects as a development-only dependency. I call this the NugetReferenceHintPathRewrite package. This package adds an MSBuild targets file to the project which executes just before the standard ResolveAssemblyReferences MSBuild target. When it executes it looks for references that specify a /packages/ folder as part of their path and then replaces the part of the path up to and including the /packages/ folder with the a new path to the currently building solution’s packages folder. This rewrite is done to the MSBuild Items in-process and does not modify the project file on disk.

The main benefit of this dynamic build-time approach is that I don’t have to worry about new packages being installed or packages being updated (ie re-installed) and the paths in the project file being set to the “wrong” path because someone else forgot to fix it before committing.

You can find the NuGetReferenceHintPathRewrite package on NuGet.org.

PowerShell Desired State Configuration Nested Configurations

In PowerShell v4’s new Desired State Configuration feature, each Node¹ defined within a Configuration results in a single MOF file and each computer’s Local Configuration Manager will only apply and monitor configuration from a single MOF file at a time. This might suggest that all the complexity of the Resource configuration for an entire computer needs to be captured within the a single Node and that DSC configuration files will become big and unwieldy fast.

However, I recently have noticed that the Get-DscResource cmdlet returns not only the built-in and custom resources installed on the computer but it also lists any Configurations defined in the current session. From this I inferred that it may be possible to include one Configuration within another so that the overall configuration of a system can be modularized into more manageable pieces.

I had an opportunity to raise this with a member of the PowerShell team and it was clarified for me that this is indeed possible, and presumably recommended. The key is that the resulting combined configuration definition must only contain one level of Nodes. That is, either the parent Configuration defines the Node, or the child Configuration defines the Node, not both.

Here is an example of defining two child Configurations which combine related Resources and a parent Configuration which then defines a Node containing both of these Configurations:


Configuration AspNet45WebServer {
WindowsFeature WebAspNet45 {
Name = 'Web-Asp-Net45'
Ensure = 'Present'
}
WindowsFeature WebWindowsAuth {
Name = 'Web-Windows-Auth'
Ensure = 'Present'
}
}
Configuration AspClassicWebServer {
param ($EnsureBasicAuth)
WindowsFeature WebAsp {
Name = 'Web-ASP'
Ensure = 'Present'
}
WindowsFeature WebBasicAuth {
Name = 'Web-Basic-Auth'
Ensure = $EnsureBasicAuth
}
}
Configuration CombinedWebServer {
Node localhost {
AspNet45WebServer aspnet45 {}
AspClassicWebServer classic {
EnsureBasicAuth = 'Present'
}
}
}

A name still needs to be associated with the child Configurations when they are included in a parent, but they may or may not require additional parameters. There is no reason that the nested Configurations be limited to any particular resource, I’ve just used the WindowsFeature resource in this example to avoid external dependencies.

¹Subject to the use of Configuration Data which may repeat a single Node multiple times.

PowerShell v4 Desired State Configuration at Sydney DevOps

I volunteered to speak about the new Desired State Configuration features in PowerShell 4.0 at the local DevOps user group in Sydney on September 19th. The technology has a lot of potential but until it is officially released and all the documentation is available, I found some aspects of Desired State Configuration difficult to understand.

If you’d like to watch my presentation, the user group was live broadcast as a Google Hangout and is now available on YouTube (my session starts at about 17 minutes in). Additionally, my colleague Meligy also painstakingly recorded the presentation with his phone camera, also available on YouTube.

The resolution of the recorded presentation may not be sufficient to read the detail on the slides or the PowerShell commands being executed during the demo. If you like to follow along at home, the slides are available on SlideShare.net and the demo script is available as a GitHub Gist.

Refactor Test Methods associated with Test Manager Test Case Automation

Since Team Foundation Server 2010, Microsoft has shipped the Test Manager product which enables testers to document manual test cases and later automate them (or just automated them from the beginning). When used to its full potential with other TFS components like Team Build and Lab Management, managing Test Cases with TFS provides a great way to improve and verify the quality of the software you deliver.

In Test Manager, or more accurately Visual Studio, automation for a Test Case is associated via two primary identifiers:

  1. The file name of the .NET Assembly containing the relevant Test Method, eg “CodedUITestProject1.dll”
  2. The namespace- and class-qualified name of the Test Method, eg “CodedUITestProject1.CodedUITest1.CodedUITestMethod1”

After associating one or more Test Methods with Test Cases you may later need to refactor your code resulting in many Test Methods moving to a new class or namespace, or even a new assembly name. Unfortunately, after this refactoring effort, Microsoft Test Manager will no longer be able to locate the Test Methods associated with affected Test Cases and the tests will fail to run.

There are some options for fixing this, of varying effectiveness:

  • Undo the refactoring – pointless but technically an option.
  • Manually open each one of the Test Cases in Visual Studio and re-associate the automation – tedious for larger numbers of tests.
  • If only the assembly name has changed, open the list of Test Cases in Excel, include the “Automated Test Storage” column, and bulk update the values.

BUT, if the namespace or class has changed, the fix could be slightly more complicated…

You may be able to use Excel with the “Automated Test Name” column included and you may find it works but there is also another column to consider, usually hidden, called “Automated Test Id”. I know this column is used by the TCM command-line tool to automatically import Test Methods into Test Cases and it may be used in other areas of Visual Studio and TFS.

In tcm.exe, the Id is based on the Test Name and used to detect if a Test Method has already been imported and to prevent the creation of duplicate Test Cases. Gautam Goenka’s blog post on associating automation programmatically demonstrates the simple Id generation algorithm used.

As per my usual style, I’ve published a PowerShell script, called “Rename-TestCaseAutomation” on GitHub Gist, which will locate all the Test Cases with associated automation using a specified Assembly Name and/or Class Name prefix and update them with a provided new Assembly Name or Class Name Prefix, and update the Id appropriately too. Here are two simple example scenarios for using it:

Rename the Assembly for all Test Cases across two different Team Projects:

Rename-TestCaseAutomation http://localhost:8080/tfs/DefaultCollection MyProject,YourProject -TestStorage CodedUITestProject1.dll -NewTestStorage FooTests.dll

Move all the Tests Methods in the “FooTests.Customer” Class to to the “FooTests.Client” Class:

Rename-TestCaseAutomation http://localhost:8080/tfs/DefaultCollection MyProject -TestNamePrefix FooTests.Customer -NewTestNamePrefix FooTests.Client

Hopefully someone else finds this useful.

Ad hoc IIS log parsing with PowerShell

There are numerous log analysis systems for IIS and for log files in general and it is probably a good idea to use such a system for ongoing monitoring. However, sometimes you just have a bunch of IIS logs and some simple questions you want to ask of the data within. PowerShell is built into the OS so its an easy default choice for this scenario.

Unfortunately the IIS W3C Extended log format doesn’t quite align with PowerShell’s built-in cmdlets. The Import-Csv or ConvertFrom-Csv cmdlets could come close when used with the -Delimiter parameter and some Header wrangling. You can even achieve a fair amount just by using Get-Content and the -split operator if you don’t mind using array indexes to access different columns.

With a little bit of extra regex and hashtable work, wrapped in a function for readability, the logs can be parsed quite simply and even handle the situation where the set of included columns changes half way through one of the log files. I wrote such a function in about 5 minutes the other day, called it “ConvertFrom-IISW3CLog” and put it on GitHub as a Gist for future reference here. It won’t handle malformed log files but the point was to keep it simple, and not to re-invent another log system.

You can use the function like this:

gci c:\inetpub\logs\LogFiles\W3SVC1 | ConvertFrom-IISW3CLog

If you wanted to find how often each URL is accessed, a simple Group-Object on the end of the pipe would tell you:

gci c:\inetpub\logs\LogFiles\W3SVC1 | ConvertFrom-IISW3CLog | group cs-uri-stem

If you want to to find which URL requests have had errors today:

$reqs = gci c:\inetpub\logs\LogFiles\W3SVC1 | ConvertFrom-IISW3CLog
$reqs | ? { $_.'sc-status' -eq 500 -and $_.date -eq '2013-08-10' }

Once your log parsing gets more elaborate, you might want to look at the Microsoft Log Parser as a more capable solution.

PowerShell Update-Help and an Authenticating Proxy

PowerShell v3 doesn’t ship with help in the box anymore. You may love this or you may hate it. Regardless of your stance, if your environment is behind an authenticating web proxy, it is not obvious how to make it work. The general guidance is to use Save-Help from another computer but this doesn’t help when every computer is behind the proxy and sneakernet is prohibited. This was my situation recently and I found a reasonably simple way to solve it.

Firstly, when trying to run Update-Help, I received an error message:

update-help : Failed to update Help for the module(s) ' ... ' with UI culture(s) {en-US} :
Unable to connect to Help content. Make sure the server is available and then try the command again.

Unfortunately, nothing about this message tells me that the problem is caused by the proxy, let alone authentication. Having dealt with the proxy in this environment before I had a suspicion, so I opened Fiddler (an HTTP debugger) and re-attempted the Update-Help command. Fiddler revealed that the HTTP response returned to PowerShell was status code 407, “Proxy authentication required”, so I was on the right track.

Inspecting Update-Help’s available parameters reveals two that might be relevant: Credential and UseDefaultCredentials. To save you some time, I can tell you that using either of these won’t help a proxy authentication issue. Under the hood, Update-Help is using .NET’s WebClient class to download the help information and these credential-related parameters correspond directly to properties of the same name on WebClient which don’t apply to proxies. Separately though, WebClient has a Proxy property which in turn has a Credentials property – this is the one I needed to find a way to set.

Luckily, even though the WebClient instance used within the implementation of the Update-Help cmdlet is not exposed, by default all instances of WebClient in the same AppDomain will share the same instance of their Proxy. So, firstly, to verify my theory, I run these commands:

$wc = New-Object System.Net.WebClient
$wc.DownloadString('http://microsoft.com')

And get the expected error:

Exception calling "DownloadString" with "1" argument(s):
"The remote server returned an error: (407) Proxy Authentication Required."

So I set the credentials on my test WebClient’s Proxy to use my current credentials that I logged in to Windows with, and test again:

$wc.Proxy.Credentials = [System.Net.CredentialCache]::DefaultNetworkCredentials
$wc.DownloadString('http://microsoft.com')

And this time I get the raw content of the Microsoft.com home page instead of an error.

I now try to run Update-Help one more time and bingo! – it works.

Now we just need to encourage Microsoft to make this easier to deal with in general by voting for these two issues on Connect.

Avoid password management with Group Managed Service Accounts

A common problem when managing deployments of applications, manual or automated, is where to securely store the passwords for service accounts used by Windows Services, IIS Application Pools, and Scheduled Tasks in each of the environments the applications are deployed to.

With Windows Server 2008 R2, the first step to simplifying this problem was introduced in the form of Managed Service Accounts. Unfortunately they suffered from the limitation of being restricted to a single computer so you couldn’t use them for load-balanced web applications, for example. It was also a challenge to get them to work for anything other than Windows Services in Server 2008.

Now, with Windows Server 2012, these accounts have matured and become Group Managed Service Accounts or gMSAs. They can be used to run processes on multiple machines and work well with IIS Application Pools and Scheduled Tasks too.

I had an early opportunity to experiment with gMSAs when Server 2012 was still a Release Candidate but more recently I’ve been fortunate to use them extensively for a multitude of applications on my current client engagement so I thought I’d share my experience with the benefits and some of gotchas.

How secure are Group Managed Service Accounts?

At the very least, they are more secure than using a domain user account for a service, because they remove the human-element, but there is more:

  • They are based on a very similar model to Domain-joined Computer Accounts (they in fact inherit from the Computer Account class in the Active Directory schema).
  • The passwords are automatically changed every 30 days (by default) and the infrastructure ensures all the necessary computers are updated.
  • The passwords are 120-characters and generated by the Domain Controllers based on a root key, the account SID, and the current time.
  • Like a computer account, only the Windows authentication infrastructure can access the password, and it is quite difficult (if not impossible) for a human to access the password.
  • They are explicitly denied the Interactive Logon right so a human couldn’t logon with one even if they could acquire the password.
  • The Domain Administrator controls which computers are allowed to run processes using the gMSA’s credentials.
  • They are least privilege accounts by default, just like a standard domain user, until they are explicitly granted additional group memberships or privileges.

What do you need to use them?

  • You’ll need at least one Windows Server 2012 Domain Controller in the domain where applications will run as gMSAs.
  • You’ll need to upgrade the AD schema for Server 2012 too.
  • You’ll need to create the root KDS key used to generate the gMSA passwords and wait for it to replicate
  • The computers where the applications will run will need to be Windows Server 2012 or later too. However, you can grant gMSAs access to resources on older OSes because appears just like Computer accounts in AD.
  • Familiarity with PowerShell because gMSAs are mostly managed via Cmdlets and have very little GUI support.

How do you use them for a Windows Service?

  1. Ensure the “PrincipalsAllowedToRetrieveManagedPassword” attribute for the gMSA includes the Computer Account where the service will run. (Be careful with tab completion and the “PrincipalsAllowedToDelegateToAccount” attribute.)
  2. Use the Install-ADServiceAccount cmdlet to prepare the account on the computer where the service will run.
  3. Use “sc.exe” or the Services management console to specify the gMSA to use to run the service. Leave the password blank. If you use the ServiceProcessInstaller class in a .NET assembly (typically combined with installutil.exe), it is not possible to specify a gMSA account, but it is possible to hack the private “haveLoginInfo” field to true via reflection to make it work. PowerShell’s New-Service cmdlet also won’t handle gMSAs.

How do you use them for an IIS Application Pool?

  1. The same as steps 1 and 2 above for a Windows Service.
  2. Use the SAM Account Name format (eg DOMAIN\Name$) to specify the gMSA using the IIS Manager, appcmd.exe, or the Set-WebConfigurationProperty cmdlet and leave the password blank. IIS doesn’t appear to accept a gMSA specified via the User Principal Name format (eg longname@domain.fqdn).

How do you use them for a Scheduled Task?

  1. Again, the same as steps 1 and 2 above for a Windows Service.
  2. Use the New-ScheduledTaskPrincipal cmdlet to specify the gMSA account to use (more details here). The Task Scheduled management console and schtasks.exe won’t accept a gMSA account.

General issues:

  • By default the New-ADServiceAccount cmdlet used to create a gMSA will limit the account name to a maximum of 15 characters and won’t set the User Principal Name (UPN). If you want to use a longer name, use the -SamAccountName parameter to specify the abbreviated name and use the -OtherAttributes parameter to specify the UPN.
  • Because gMSAs are explicitly denied the Interactive Logon right, they can’t be used to access other systems which impersonate users interactively. SQL Server Reporting Services is one example where an application running as a gMSA will need to provide alternate credentials to connect.
  • Avoiding the need to manage passwords ourselves is a major convenience of Group Managed Service Accounts and this involves a security trade-off. Once a Domain Administrator adds a computer, for example “SERVERA”, to a gMSA’s PrincipalsAllowedToRetrieveManagedPassword list, all local Administrators of SERVERA can now configure any service, apppool, or task to run as that gMSA. If you don’t trust the sysadmins of SERVERA or the other applications on SERVERA, this could be provide a mechanism to escalate network privileges.

Given the need for environment of new server OSes, account name length limitations, and using the command-line instead of a GUI to configure everything, are gMSAs worth it. For me, it has been a resounding “Yes!” but I have a strong personal distaste for password management, especially in heavily automated Continuous Delivery scenarios. I also prefer to run each application in its own virtual machine wherever feasible.