Category: MSBuild
Override the TFS Team Build OutDir property in TFS 2013
I’ve blogged twice before about the OutDir MSBuild property set by Team Build and I’ve recently discovered that with the default build process templates included with Team Foundation Server 2013, the passing of the OutDir can be disabled via a simple Team Build process parameter.
The parameter I am referring to is the “Output location”:
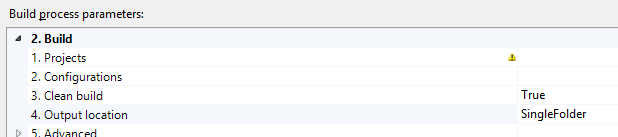
This parameter’s default value, “SingleFolder”, gives the traditional Team Build behaviour – the OutDir property will be specified on the MSBuild command-line and, unless you’ve made other changes, all build outputs will be dropped into this single folder.
Another value this parameter accepts is “PerProject” but this name can be slightly misleading. The OutDir property will still be specified on the MSBuild command-line but Team Build will append a subfolder for each project that has been specified in the Build Definition. That is, you may choose to build SolutionA.sln and SolutionB.sln from a single Build Definition and the “PerProject” option will split these into “SolutionA” and “SolutionB” subfolders. It will not output to different subfolders for the projects contained within each solution – for this behaviour you should specify the GenerateProjectSpecificOutputFolder property as an MSBuild argument as I’ve blogged previously.
The value of the “Output location” that you’ve probably been looking for is “AsConfigured”. With this setting, Team Build will not pass the OutDir property to MSBuild at all and your projects will all build to their usual locations, just like they do in Visual Studio – presumably to a \bin\ folder under each project. With this setting, it is then your responsibility to configure a post-build target or script to copy the required files from their default build locations to the Team Build binaries share. For this purpose, Team Build provides a “TF_BUILD_BINARIESDIRECTORY” environment variable specifying the destination path to use. There are also some other environment variables populated by Team Build 2013 documented here.
At the end of the build process, Team Build will then copy the contents of the TF_BUILD_BINARIESDIRECTORY to either the UNC path drop folder, or to storage within the TFS Collection database itself as you’ve chosen via the Staging Location setting on the Build Defaults page.
However, before you rush away to use this new capability, consider that the MSBuild, or more accurately the set of Microsoft.*.targets files used by almost all projects, already contain a great quantity of logic for handling which files to copy to the build drop. For example, Web Application projects, will copy the contents of the \bin\ folder and all the other content files (eg css, javascript, and images) whilst excluding C# code files, and the project file. Instead of re-implementing this behaviour yourself, leverage what MSBuild already provides and use the existing hook points to adjust this behaviour when you need to alter it for your situation.
If you’re interested, you’ll find that this new “Output location” behaviour is now implemented in the new RunMSBuild workflow activity, specifically within its RunMSBuildInternal private nested activity.
Override the TFS Team Build OutDir property in .NET 4.5
Update: with Team Build 2013 it is easier still.
I’ve blogged before about the challenge of overriding the OutDir MSBuild property set by Team Build but this hassle is gone in version 4.5 of the .NET Framework.
I stumbled upon a change to the core Microsoft.Common.targets file while trying to understand some build issues with a work project and discovered new logic to modify the OutDir property depending on a variety of conditions. I went searching through the rest of the file for other references to OutDir and also discovered at the top of the file, a new attribute on the Project element. This new attribute’s name is “TreatAsLocalProperty” and it’s value is simply “OutDir”.
As at the time of posting this blog entry I could not find any documentation of this new functionality but based on my own testing I found that .NET Framework 4.5 now supports:
- Overriding the value of an MSBuild property that was specified at the MSBuild command-line by naming that property in the TreatAsLocalProperty attribute at the top of the build project.
- OutDir can now be specified at the command-line without a trailing slash and it will be corrected for you instead of failing the build.
- Projects can automatically build to subfolders of the Team Build drop location by setting a new MSBuild property named “GenerateProjectSpecificOutputFolder” to “true”.
- The project-subfolder will be named the same as the project file but can be overridden by specifying an alternate value for the “ProjectName” MSBuild property.
- The OutDir property can now be overridden in whatever custom way you like without modification of the Team Build workflow xaml or using a before-solution targets file.
And because .NET 4.5 is an addition to .NET 4 in the same way .NET 3.5 and .NET 3.0 were to .NET 2.0, your existing .NET 4/VS2010 projects can benefit from this new build-time functionality without taking on new run-time dependencies (with some exceptions). Here is a screenshot for how to configure Team Build 11 or a Team Build 2010 server with .NET 4.5 installed to create per-project folders in the build drop:

Rules to Customising a .NET Build
It doesn’t take long before any reasonable software project requires a build process that does more than the IDE’s default Build command. When developing software based on the .NET platform there are several different ways to extend the build process beyond the standard Visual Studio compilation steps.
Here is a list for choosing the best place to insert custom build steps into the process, with the simplest first and the least desirable last:
- Project pre- and post-build events: There is a GUI, you have access to a handful of project variables, can perform the same tasks as a Windows Batch script, and still works with Visual Studio’s F5 build and run experience. Unfortunately only a failure of the last command in a batch will fail the build and the pre-build event happens before project references are resolved so avoid using it to copy dependencies. Continue reading
Override the TFS Team Build OutDir property
Update: with .NET 4.5 there is an easier way.
A very common complaint from users of Team Foundation Server’s build system is that it changes the folder structure of the project outputs. By default Visual Studio puts all the files in each project’s respective /bin/ or /bin/<configuration>/ folder but Team Build just uses a flat folder structure putting all the files in the drop folder root or, again, a /<configuration>/ subfolder in the drop folder, with all project outputs mixed together.
Additionally because Team Build achieves this by setting the OutDir property via the MSBuild.exe command-line combined with MSBuild’s property precedence this value cannot easily be changed from within MSBuild itself and the popular solution is to edit the Build Process Template *.xaml file to use a different property name. But I prefer not to touch the Workflow unless absolutely necessary.
Instead, I use both the Solution Before Target and the Inline Task features of MSBuild v4 to override the default implementation of the MSBuild Task used to build the individual projects in the solution. In my alternative implementation, I prevent the OutDir property from being passed through and I pass through a property called PreferredOutDir instead which individual projects can use if desired.
The first part, substituting the OutDir property for the PreferredOutDir property at the solution level is achieved simply by adding a new file to the directory your solution file resides in. This new file should be named following the pattern “before.<your solution name>.sln.targets”, eg for a solution file called “Foo.sln” then new file would be “before.Foo.sln.targets”. The contents of this new file should look like this. Make sure this new file gets checked-in to source control.
The second part, letting each project control its output folder structure, is simply a matter of adding a line to the project’s *.csproj or *.vbproj file (depending on the language). Locate the first <PropertyGroup> element inside the project file that doesn’t have a Condition attribute specified, and the locate the corresponding </PropertyGroup> closing tag for this element. Immediately above the closing tag add a line something like this:
<OutDir Condition=" '$(PreferredOutDir)' != '' ">$(PreferredOutDir)$(MSBuildProjectName)\</OutDir>
In this example the project will output to the Team Build drop folder under a subfolder named the same as the project file (without the .csproj extension). You might choose a different pattern. Also, Web projects usually create their own output folder under a _PublishedWebSites subfolder of the Team Build drop folder, to maintain this behaviour just set the OutDir property to equal the PreferredOutDir property exactly.
You can verify if your changes have worked on your local machine before checking in simply by running MSBuild from the command-line and specifying the OutDir property just like Team Build does, eg:
msbuild Foo.sln /p:OutDir=c:\TestDropFolder\
Build Azure projects without installing the Azure SDK on your build server
In general, an automated build server should be usable to build multiple projects and multiple revisions of a single project. An automated build server should also be disposable, it should not contain any special configuration that isn’t already tracked in source control, and provisioning a new build server should not require hunting for the installers for specific versions of dependencies.
By default however, the Windows Azure SDK for .NET doesn’t work this way. To build an Azure project from a build server you need the full SDK installed and suddenly this means the build server is tied to only building projects targeting a specific version of the Azure SDK. If several projects share a single build server then all projects need to be upgraded to the new SDK when one project is upgraded and performing builds on maintenance branches becomes difficult if not impossible.
Simply copying some Azure SDK files into a source-controlled “Dependencies” folder won’t help much either because the (v1.6) build scripts make some assumptions:
- The Azure tools are located at a fixed path under the Program Files folder
- The Azure SDK is located at a path referred to by a HKEY_LOCAL_MACHINE Registry key
- A common .targets file has been installed in the MSBuild extensions folder so every project system-wide references it automatically
Finding and fixing these assumptions is required so that a source-controlled copy of the SDK will work but these assumptions can change (and have changed) in each new version of the SDK so it is important not to be tempted to edit the original files but instead utilise the various hook points in MSBuild to override these assumptions.
Ideally the Azure SDK would just be a Nuget package but until the product team can be convinced to do this, I have published some scripts which allow you to build your own Nuget package of the Azure SDK with all the afore mentioned assumptions fixed. My scripts require a machine with the SDK already installed because I doubt I have the rights to redistribute original files.
The scripts are available in a Mercurial repository hosted on Bitbucket. After cloning or downloading a copy of the repository, just run MSBuild in the root and it will gather the necessary SDK files from your system and produce a Nuget package in the “output” subfolder. From there you might ideally install the package in your Azure project (the *.ccproj file) using this command from the Package Manager Console:
Install-Package -Id Microsoft.WindowsAzure -Source [path to the "output" subfolder]
Unfortunately, at the time of writing this Nuget (also v1.6) doesn’t support Azure projects so slightly more work is required. First, install the package into the target solution’s “packages” folder using the “nuget.exe” command-line interface:
nuget.exe install Microsoft.WindowsAzure -Source [path to the "output" subfolder] -OutputDirectory [path to the solution "packages" folder]
The open the Azure project’s “.ccproj” file for editing in a text editor and add the following line immediately after the opening <Project … > element:
<Import Project="..\packages\Microsoft.WindowsAzure.1.6\tools\Microsoft.WindowsAzure.Nuget.targets" />
Note that the relative path to the “.Nuget.targets” file may be slightly different depending upon project and solution directory structures. You can vote to get Azure support added to Nuget here.
