Category: Security
Busy May
In January I presented at the Sydney ALT.NET user group about HTTPS, focusing on all the new advancements in this space and some long-held misconceptions too. It was well received so I re-presented it at the Port80 Sydney meetup in March.
I met Steve Cassidy from Macquarie University who was also presenting at the same Port80 meetup and I was invited to present the talk a third time as a guest lecture to second year Macquarie University Computer Science students on May 4th. The lecture was filmed but is only available to those with a student login. My slide deck from Port80 is available on SlideShare though.
On May 19th I delivered a breakfast talk about my experience deploying some of section.io’s infrastructure into Azure. The video of this talk is publicly available and so are the slides.
This year my friend Aaron lead the organising of the return of the DDD conference in Sydney. I submitted a talk proposal and was fortunate to receive enough votes to earn a speaking slot. So, on Saturday May 28th I presented “Web Performance Lessons” which covered a variety of scenarios I had encountered while improving the performance of other people’s websites as part of my job at section.io. The talk was recorded by the conference sponsor SSW and is available to watch here. Also my slides can be viewed at SlideShare.
At the Port80 meetup in March I also met Mo Badran who organises the Operational Intelligence Sydney meetup. Mo asked if I could do a presentation of how section.io handles operations so on Tuesday May 31st I presented “Monitoring at section.io” where I shared a bunch of detail about our tools and processes for operational visibility at section.io, both for the platform itself, and for users of our CDN. Those slides are published on SlideShare too.
I’ll take a break from speaking in June and instead absorb what other people have to share at the Velocity conference in Santa Clara and take the opportunity to also check out the new section.io office in Colorado.
I know this blog has been quiet for a while. I have been posting most of my written content over at the section.io blog lately and will probably continue to blog there more often than here in the near future. Some of my recent posts include:
Adding HPKP to my blog
In my last post I described how I added HTTPS to my blog and mentioned that implementing HTTP Public Key Pinning (HPKP) was still pending.
The purpose of HPKP is to protect your site in the event that a trusted Certificate Authority issues a certificate for your site to the wrong person. This can happen, and has happened, due to a process error, or due to the CA’s systems being breached. Either way it can enable a 3rd party to Man-In-The-Middle attack your site with often no indication that something is wrong. HPKP allows you to inform the browser that only certain public keys that you’ve pre-approved should be accepted, even if all other aspects of the certificate appear valid.
The reason I didn’t get HPKP done up front is because the process is somewhat arduous even though the end result is simply serving an extra HTTP response header of the format:
Public-Key-Pins: pin-sha256="..fingerprint.."; pin-sha256="..another.."; max-age: 1234;
A single response header may appear trivial at first but there is some complexity waiting to trip you up.
Firstly, the fingerprint is different to any of the other fields you may normally see in a typical certificate information dialog. The fingerperint is a SHA-256 (or SHA-1) digest of the public key (and some public key metadata) which is then base64 encoded. To generate this fingerprint typically involves piping between two or more consecutive openssl commands and OpenSSL isn’t renowned for its clarity.
Starting with an existing certificate, a certificate signing request (CSR), or a private key will each change which collection of OpenSSL commands you need to execute to generate the fingerprint. There is at least one online tool to help with this (thanks Dāvis), but be wary of using any online tools which require the private key.
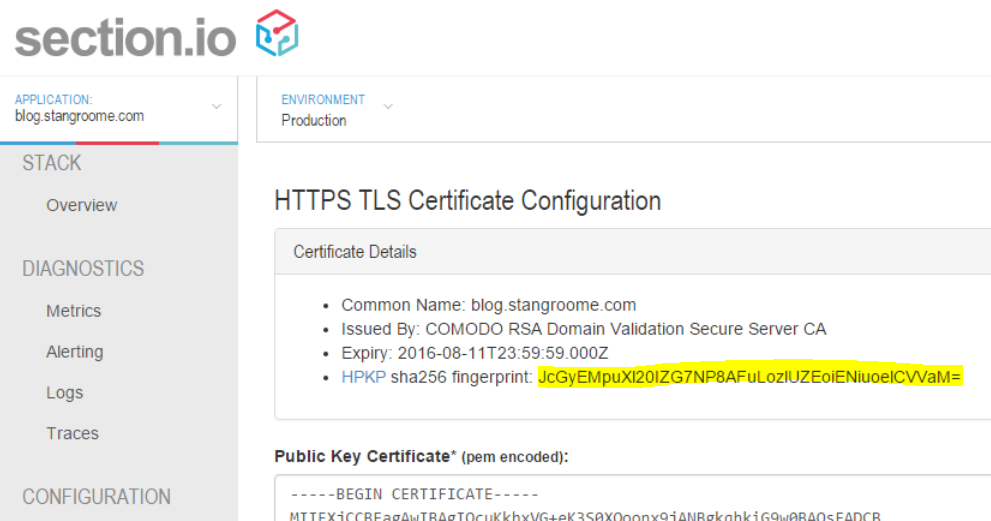
To make life a little easier for section.io users, I added the calculated fingerprint to the HTTPS configuration page:
The second gotcha is that the header is not valid with only a single fingerprint of the public key from the certificate currently in use on your site. The specification (RFC 7469) requires that you also include at least one extra fingerprint of a backup public key that you can switch to in the event of a lost or stolen private key. And it is good idea to include fingerprints for two backup keys.
Before you assume that this means you need to buy more certificates, you should note that you only need the fingerprint of the public key component. This means you can generate a key pair, or a CSR, with which you will later purchase a new certificate only in the event that you need to replace your current certificate. Key pairs and CSRs do not expire – although, technically, your chosen key length or algorithm may become less secure as time passes and technology progresses.
The third issue to be mindful of is the max-age directive in the header. This is the number of seconds that a user-agent should cache these fingerprints. Do not conflate this with the validity period of your signed certificate, as certificates expire on a fixed date but the HPKP header is valid for a fixed period starting from the moment the browser parses the header.
With a max-age value equivalent to 365 days, a user could visit your site one month before your certificate expires and then persist your Public-Key-Pins header data for the next 12 months, well past when certificate’s validity. But this is OK. You will likely renew your certificate with the same public key, or renew it with one of the backup public keys already mentioned in your HPKP header.
It is just important to realise that the HPKP max-age is different from the certificate validity and browsers may limit the upper age limit. Ensure that you balance the age and the number of backup keys you think you may need in that age period. And when you consume a backup key from your HPKP header, you should update your header with a new backup key that will be slowly acknowledged by browsers as their cache of your HPKP header expires.
With all that, I added the HPKP response header to my site with the following Varnish configuration:


Adding HTTPS to my blog, economically
I’ve been hosting my blog with WordPress.com for about the last five years for one simple reason: I want to spend my time writing content, not messing about with server maintenance or blog engine updates. If I was making the same decision today I might choose Jekyll or Ghost instead but WordPress.com was just easy and I have no reason to change. Well, maybe one reason…
Security has always been a passion, and these days it is a significant part of my job. I am a fervent supporter of HTTPS everywhere (the concept, not the browser extension) and I recently realised that my blog was not only served without HTTPS by default but it failed with certificate warnings when accessed via HTTPS. My first thought was to bump up my WordPress.com plan to something with TLS support but when I went looking for this option I found that not only do WordPress.com not offer this, they have published some dangerous misinformation about their HTTPS support.
I wanted to avoid going through the effort of migrating my blog to new hosting. All I really needed was to put an intelligent HTTPS proxy in front of my existing blog. Conveniently that is a core component of what my team and I have been building this year: section.io. In short, section.io is a HTTP-reverse-proxy-as-a-service solution focused on a providing a great DevOps story. At the moment it is predominantly used for Varnish Cache cloud-hosting but its capabilities are growing rapidly.
With section.io I was able to register a new, free account and within about 3 minutes the infrastructure had been provisioned to proxy my WordPress.com-hosted blog through a default configuration of Varnish 4. For now, because WordPress.com do their own caching, and I want to focus on writing blog content, I’m leveraging Varnish only for response header manipulation, not caching.
Also, because Varnish Cache (and inevitably other proxies that section.io will support one day) doesn’t have native HTTPS support, section.io provides a thin TLS-offload layer in front of Varnish, all I need to do is upload a certificate. For recent years, my DNS host and registrar of choice is DNSimple and they now sell TLS certificates too. Through DNSimple, I bought a Domain Control Validated certificate for only US$20 for the year, which is then issued by Comodo.
I uploaded my new certificate and private key into the section.io management portal and moments later my blog could be accessed via HTTPS and I was greeted with a friendly green padlock. I should point out that the free HTTPS support on section.io does not support non-SNI capable user agents at this time but I’m comfortable ignoring that quickly shrinking pool of browsers for my blog.

Merely being able to access my blog via HTTPS is not enough however, I want it to be accessed only via HTTPS so that requires a little more work, but its all achievable with a little bit of Varnish Configuration Language.
section.io strives to provide the same unconstrained Varnish experience one would get from hosting Varnish themselves. In this instance, I get access to the default.vcl file in my own section.io account’s git repository, and a convenient web-based editor to make quick changes.
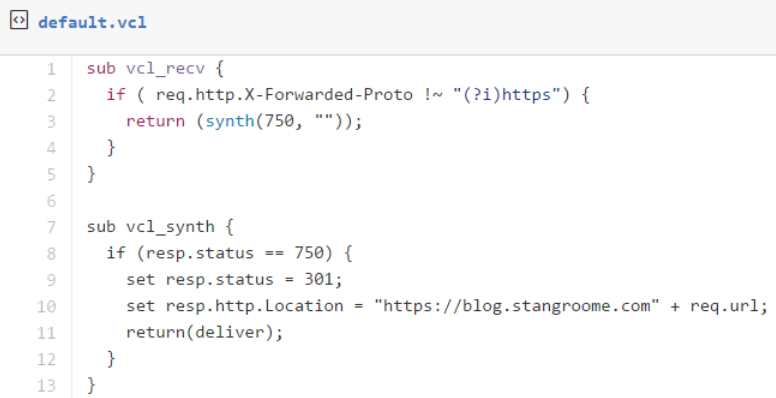
The first change is to add some VCL to detect whether the request was made without HTTPS, by inspecting the conventional X-Forwarded-Proto header, and respond with a synthetic 301 Moved Permanently response to the HTTPS URL as appropriate:
The second change is to add HSTS response headers so that return visitors will automatically use HTTPS for all requests without needing the server-side redirect:

At this point section.io is configured to serve my blog as HTTPS-only but public traffic is still hitting WordPress.com directly. When I registered my blog site with section.io I was provided with a new CNAME value to configure my blog’s DNS to resolve to. I didn’t change over immediately though, I used Fiddler (or my local HOSTS file) to simulate the change and verify I had everything working right. I’ve since changed my public DNS records and you should now be reading this post over HTTPS.
Troy Hunt has recently blogged about the generally “premium” nature of TLS being a blocker of wider HTTPS adoption, and he is right, but there are a number of more affordable solutions growing in response to the increasing demand. What I have found though is that the cost of certificates and hosting is quickly surpassed by the knowledge required to implement HTTPS right because it is so much more than just getting a key pair and talking HTTP through an encrypted tunnel.
A good HTTPS deployment needs to consider TLS protocol versions and cipher suites, needs to avoid mixed-mode content, and utilise HPKP, which I’ll be configuring on my blog soon. Some of this will hopefully be handled by your hosting provider but a lot also crosses over into the application domain.
Avoid password management with Group Managed Service Accounts
A common problem when managing deployments of applications, manual or automated, is where to securely store the passwords for service accounts used by Windows Services, IIS Application Pools, and Scheduled Tasks in each of the environments the applications are deployed to.
With Windows Server 2008 R2, the first step to simplifying this problem was introduced in the form of Managed Service Accounts. Unfortunately they suffered from the limitation of being restricted to a single computer so you couldn’t use them for load-balanced web applications, for example. It was also a challenge to get them to work for anything other than Windows Services in Server 2008.
Now, with Windows Server 2012, these accounts have matured and become Group Managed Service Accounts or gMSAs. They can be used to run processes on multiple machines and work well with IIS Application Pools and Scheduled Tasks too.
I had an early opportunity to experiment with gMSAs when Server 2012 was still a Release Candidate but more recently I’ve been fortunate to use them extensively for a multitude of applications on my current client engagement so I thought I’d share my experience with the benefits and some of gotchas.
How secure are Group Managed Service Accounts?
At the very least, they are more secure than using a domain user account for a service, because they remove the human-element, but there is more:
- They are based on a very similar model to Domain-joined Computer Accounts (they in fact inherit from the Computer Account class in the Active Directory schema).
- The passwords are automatically changed every 30 days (by default) and the infrastructure ensures all the necessary computers are updated.
- The passwords are 120-characters and generated by the Domain Controllers based on a root key, the account SID, and the current time.
- Like a computer account, only the Windows authentication infrastructure can access the password, and it is quite difficult (if not impossible) for a human to access the password.
- They are explicitly denied the Interactive Logon right so a human couldn’t logon with one even if they could acquire the password.
- The Domain Administrator controls which computers are allowed to run processes using the gMSA’s credentials.
- They are least privilege accounts by default, just like a standard domain user, until they are explicitly granted additional group memberships or privileges.
What do you need to use them?
- You’ll need at least one Windows Server 2012 Domain Controller in the domain where applications will run as gMSAs.
- You’ll need to upgrade the AD schema for Server 2012 too.
- You’ll need to create the root KDS key used to generate the gMSA passwords and wait for it to replicate
- The computers where the applications will run will need to be Windows Server 2012 or later too. However, you can grant gMSAs access to resources on older OSes because appears just like Computer accounts in AD.
- Familiarity with PowerShell because gMSAs are mostly managed via Cmdlets and have very little GUI support.
How do you use them for a Windows Service?
- Ensure the “PrincipalsAllowedToRetrieveManagedPassword” attribute for the gMSA includes the Computer Account where the service will run. (Be careful with tab completion and the “PrincipalsAllowedToDelegateToAccount” attribute.)
- Use the Install-ADServiceAccount cmdlet to prepare the account on the computer where the service will run.
- Use “sc.exe” or the Services management console to specify the gMSA to use to run the service. Leave the password blank. If you use the ServiceProcessInstaller class in a .NET assembly (typically combined with installutil.exe), it is not possible to specify a gMSA account, but it is possible to hack the private “haveLoginInfo” field to true via reflection to make it work. PowerShell’s New-Service cmdlet also won’t handle gMSAs.
How do you use them for an IIS Application Pool?
- The same as steps 1 and 2 above for a Windows Service.
- Use the SAM Account Name format (eg DOMAIN\Name$) to specify the gMSA using the IIS Manager, appcmd.exe, or the Set-WebConfigurationProperty cmdlet and leave the password blank. IIS doesn’t appear to accept a gMSA specified via the User Principal Name format (eg longname@domain.fqdn).
How do you use them for a Scheduled Task?
- Again, the same as steps 1 and 2 above for a Windows Service.
- Use the New-ScheduledTaskPrincipal cmdlet to specify the gMSA account to use (more details here). The Task Scheduled management console and schtasks.exe won’t accept a gMSA account.
General issues:
- By default the New-ADServiceAccount cmdlet used to create a gMSA will limit the account name to a maximum of 15 characters and won’t set the User Principal Name (UPN). If you want to use a longer name, use the -SamAccountName parameter to specify the abbreviated name and use the -OtherAttributes parameter to specify the UPN.
- Because gMSAs are explicitly denied the Interactive Logon right, they can’t be used to access other systems which impersonate users interactively. SQL Server Reporting Services is one example where an application running as a gMSA will need to provide alternate credentials to connect.
- Avoiding the need to manage passwords ourselves is a major convenience of Group Managed Service Accounts and this involves a security trade-off. Once a Domain Administrator adds a computer, for example “SERVERA”, to a gMSA’s PrincipalsAllowedToRetrieveManagedPassword list, all local Administrators of SERVERA can now configure any service, apppool, or task to run as that gMSA. If you don’t trust the sysadmins of SERVERA or the other applications on SERVERA, this could be provide a mechanism to escalate network privileges.
Given the need for environment of new server OSes, account name length limitations, and using the command-line instead of a GUI to configure everything, are gMSAs worth it. For me, it has been a resounding “Yes!” but I have a strong personal distaste for password management, especially in heavily automated Continuous Delivery scenarios. I also prefer to run each application in its own virtual machine wherever feasible.
